
Garage heaters are a great way to keep your home warm in the winter. However, you can connect natural gas to your home’s gas line. It will help your garage warm. Besides, you can take the help of a professional to join the heater to the central gas line of the house.
Moreover, you have to install a venting system in your garage heater. The process is much easier than you think. Most people think that process is callous. However, the process is not complicated.
In this article, I will reveal how to vent a garage heater. After reading this article, you can quickly vent it. So, let’s start our journey.
How to Vent a Garage Heater
Now, I will give step to step instructions to vent a garage heater. You will know both instructions about roof vents and wall vents installation. First, you have to know what accessories you need for your work.
What You Will Need
I’ll describe two methods to vent a garage heater. However, you need some materials for venting. So, let’s know about this:
- Ducts and Vent Cap
- Pencil
- Power drill & Reciprocating Saw
- Ladder
- Metal snips and Screwdriver
- Plumbers tape
Instructions for Roof Vents
It is one of the most common and easy methods to vent a garage heater. In this way, your garage heater can release the exhaust gas inside the garage itself. However, many people take help from professionals for this work. But you can do it yourself because this process is not complicated. So let’s follow the steps to complete the job correctly.
Step: 1 Measuring the Duct
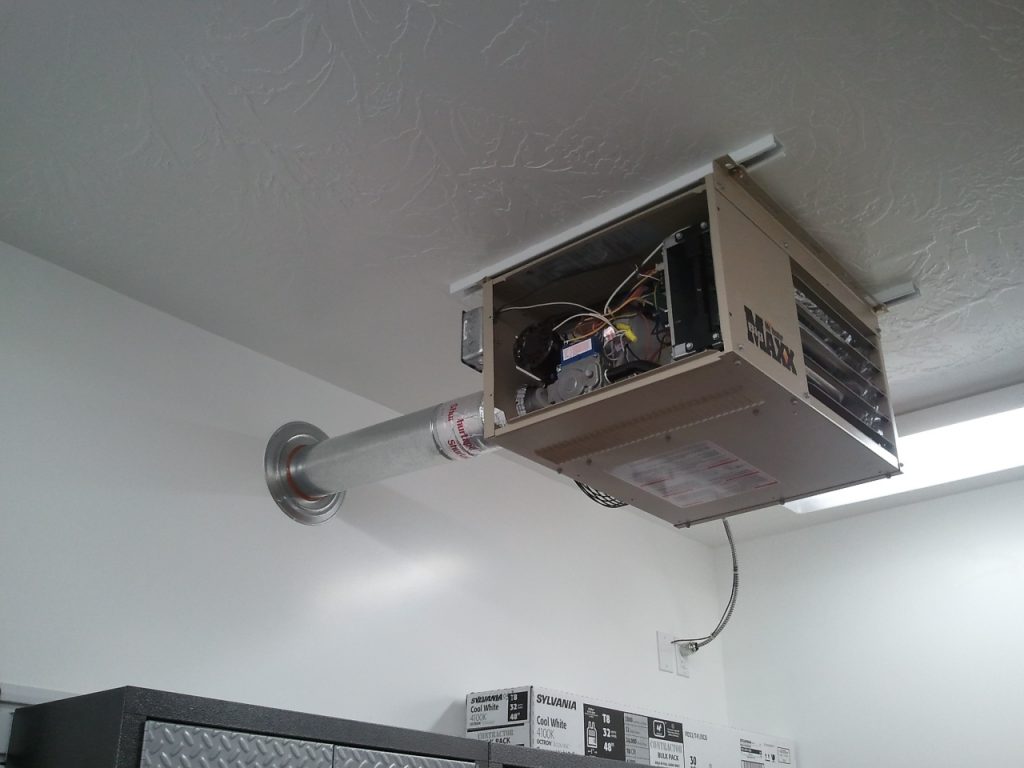
First, you need a duct that matches the heater flange to provide ventilation to your garage heater. Besides, you should specify the dimension in the original package of the heater. You can also measure this with tape. Now, you have to determine the length of the duct to create the vent. Using the tape, you can measure the distance between the heater and the vent install side.
Step: 2 Determining the Position
Now, you have to outline the hole in your roof where you will drill. First, Hold a 90-degree duct elbow on the tube. And put it in the vent flange in your garage. Next, draw a circle around the side of the duct on the roof with a pencil. After that, draw one more circle, one or two inches larger than the first one.
Step: 3 Cutting the Holes
In these steps, you have to cut the holes. So, using a power drill, it is necessary to pilot holes. These holes must be four and a half inches. If the holes are ready, start the actual cutting. After cutting, you have to remove shingles around the hole. After that, you have to make another hole in the roof flashing.
Steps: 4 Inserting the External Piece
Stand in the hole you made in the roof and lengthen the part of the drain. However, drain at least 24 inches. After that, place it on the top of the drain with the vent cap. Be sure to tighten the screws.
Step: 5 Securing the Middle Piece
It’s time to measure the distance between the 90-degree elbows. It connects the heater and duct portion. So, increase the distance to 16 inches with the specific length. Also, cut a plumber’s taps.
Step: 6 Installing the Extra Pieces
Now, check everything again. If everything is ok, you can install it. You can also add an extra drain if you need it before installing.
Step: 7 Connecting the Elbow
After that, secure the elbow to the garage heater. For this, you have to attach a one-inch tapping screw. Now, connect the elbow and run your heater.
Also Read: Reviews Of Best 240V Electric Garage Heater
Instruction for Wall Vents
Installing a vent through the roof is an alternative solution for venting garage heaters. That must say, most people take this method. Because it keeps your roof intact. The materials are the same as roof vents. So, let’s know about this process:
Step: 1 Measuring the Distance
Your first task in installing a garage heater venting system determines the distance between the heater and the walls. However, most people like to install this vent behind the heater. When you place the elbow on the heater flange, the top of the elbow should point toward the wall where you will cut.
Step: 2 Tracing the Outline
Now, trace your outline. You have to draw a circle when inserting the duct through the roof. However, this circle can determine the exact diameter of the vent. You also have to make one more circle which is two inches larger than the first one.
Step: 3 Cutting the Wall
After that, you have to cut the walls. A dry-cutting knife will help you. Make sure you also drill a hole in the outside of the garage.
Step: 4 Inserting the Duct
Vents can be easily inserted only through holes in the wall. You can also keep the vent cap outside. Now, seal around the drain so that no heat can escape from the garage.
Step: 5 Mounting the Inside Duct System
All but one of these steps is equivalent to installing the vent. However, you have to work horizontally instead of vertically. You also need to help when your duct is fixed in one place while securing it in another place. So, you can take someone’s help and also support this duct with some furniture.
Also Read: Best Electric Garage Heater of 120V
Ending Thought
So, venting your garage heater is not a challenging process. However, people take help from experts. Because they have to dig holes in their roofs or don’t have time. At first, it may seem scary to many people. But it is very easy to install. It would be great if you had the patience for this work.
Moreover, if you know how to vent a garage heater attentively, you can quickly install your garage heater. However, you must be careful when making holes in the roof. Try to make holes in the wall. So, now the choice is yours which method do you like for venting a garage heater? But you must maintain your building code while working.