
People use Garage heaters for various purposes. There are different ways you can use it. However, you can use this garage heater to spend time in a specific place. It also allows you to keep your garage space warm in winter. Besides, you can warm your garage all year round. An electric garage heater is one of the most excellent ways to do this.
Moreover, you have to install the electric garage heater before using it. This garage heater is very easy to install. However, not knowing the method, many people think that the installation process is very hard. If you follow the rules, you can do the installation alone without anyone’s help. Furthermore, you must have to know the proper placement for your garage heater.
In this article, I will discuss how to install and wire an electric garage heater quickly. Also, discuss some safety tips, which allow you to avoid risk. After reading this, you can easily install your garage heater on your own. So, let’s dive into the installation.
What You Will Need Before Starting the Work
Before starting the work, you must know the tools or things that you need. It will be helpful for you if you know these. So, let’s learn about these:
- Electric garage heater
- Junction box
- Cable straps
- 21 amp double circuit breaker
- 1/2-inch flexible metal conduit and connectors.
- Two black and green wire
- Utility knife
- Wire nuts
- Wall-mounted voltage thermostat
- Pillars and FMC connectors
These ten pieces of equipment are essential for completing your work. However, you have to add some additional tools, but these ten are the foremost element.
How to Install and Wire a Garage Heater
To install and wire the garage heater, you must have a 220-volt circuit to install the heater. However, working at 220 volts is a little dangerous. Besides, you can talk to an electrician to get the necessary power supply for you.
The following steps will show how to install and wire a garage heater even at 220 volts. So, let’s start the process.
1. Turn the Power Off at the Breaker
When you do some electrical work, first, switch off the breaker panel where you are working. If you work on the main power plan of your home, it is best to turn off the electricity in the whole house. Also, check if you have the panel, you have to install the 220-volt dual pole breaker.
2. Run Conduit to the Panel
First, make a hole in the wall with a drill from the panel. After that, you have to connect the drain to a genuine part around the wall or outside the building. But it depends on the location of your panel and your access. The structure of each house is different.
So, it is essential to understand how you can run the conduit. When working inside walls, you can use Romex cabling instead of conduit. If there is electricity flowing outside the walls, it is better to turn it off.
Moreover, you can use a 1/2″ EMT conduit that combines the fitting, elbow, and connection. You can also find it at the hardware store. For cutting the conduit, you can use a pipe cutter.
Now, find a position in the garage where you can hang the heater. It is out of the way of your garage doors. However, you must make sure that the heater is sensitive to reduce the risk of fire.
3. Running the Wiring
To do this, you can use it in 10 gauge standard red, green and black wire. However, It will heat the red and black wires in alternative ways. And the green wire is a ground wire. Since it is a 220-volt circuit, white neutral wires are not required.
To install, you have to feed three wires out with a conduit in the panel. Now with the ground bar of the panel, the ground wire, break, and terminal crew will add red and black wire. The average draw of the heater is 21 amp.
You can use fish tape. Then, give it from the ceiling junction box to below the junction box. Now, keep the fishing tape around. However, it is secured with electrical tape and connected to it.
Now you can use an extra piece of conduit to mount the cable spools of the house. When you pull them back with a conduit with a couple of fish tapes, the spools are free. So, it would be best if you put a grounding pigtail. It will be associated with each junction box.
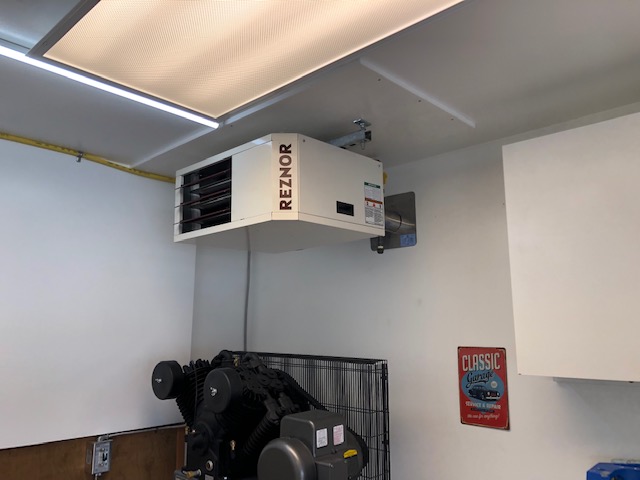
4. Hanging the Heater
Installing the heater is more accessible than other work in the project. Now, choose the bracket. It is mounted on walls or ceilings. Besides, protect the place with the lag bolt in the area where work is. If the bracket is installed, mount drought is a matter of time. So, you have to hang the carriage bolt and spacer in a protected place.
5. Connecting the Wiring
You can use a flexible appliance whip to connect the heater wires to the junction box on the ceiling. However, you can find it at a local hardware store. After that, run the wiring with a hose. Also, connect the junction box and heater with the included attachments.
Moreover, now connect the wires using some wire nuts. Then, turn off the heaters and connect the colored wire to the wire knot at the end. After that, place the cover in the junction boxes and connect all the wires in the junction boxes.
6. Turning Power On and Testing the Heater
Now, the work of installing your heater is almost over. So, start the breaker’s power again and turn on the heater. However, within two minutes, your heater will be pretty hot. There is a button to control its temperature. By which, you can reduce and increase temperature.
Besides, you can also crank if you want. Indeed it can pump a lot of heat. Now, your heater is ready. Thus, you can enjoy the heat. You can also efficiently deal with the cold. So, enjoy your heater and remove the cold.
Tips To Install a Garage Heater
There are some things you must think about and be careful about while installing. So, read these tips below and avoid the risk:
- Examine your state’s ordinances before installing a garage heater. If the installation code is correct, then go to work. Otherwise, you will get in trouble.
- Be sure to follow the manufacturer’s instructions before installing a new electric garage heater.
- If you are hesitant to install your new electric garage heater, please do not take the risk. Contact an electrician quickly. Because here electricity circulated. So, it would be dangerous for you.
- Insulate your garage because it will keep you well both in winter and summer. It also keeps cool in summer and warm in winter. However, it helps you save money. Besides, it can make your garage heater more efficient.
- If you are thinking of heating an ample space with a garage heater, change the plan. Think about buying two garage heaters or buying one with a high BTU rating ( The Blazing Home has given proper knowledge on BTU ratings for garages in this article). After that, go to the installation process because one garage heater is not suitable for a large space. To clarify, you can enjoy a comfortable warmth if you take at least two garage heaters or an electric garage heater with a high BTU rating.
Ending Thought
Hope you understand the whole process. This is how to install and wire a garage heater. It would be great if you worked step-by-step, as I mentioned. So, it will be helpful for you. Besides, there are some tips to avoid risk, and the tools required for this installation.
Moreover, you can reduce costs easily. Because if you read the whole process attentively, you can quickly complete your work without professional help. So, don’t waste your time. Take action accordingly.